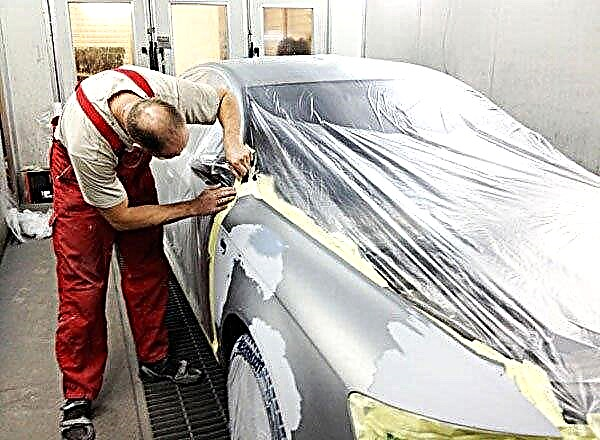
Body painting always starts with its preparation. Consider the nuances of preparing the body of the Audi A6 and the process itself.

The content of the article:
- Body cleaning
- Primer
- Putting on the body
- Grinding
- Body repair place
After operating a car for some time, literally every motorist is overtaken by such a problem as cracks and scratches on the surface of his favorite car. It is worth noting that these problems appear due to a sufficiently long stay of the car in the sun, as well as due to the effect of various chemicals.
It is the last provocateur that leads to the fact that paint begins to leak and deform on the surface of the car. And after a while, the question arises in painting the car. Coloring it is a process that must be taken seriously, since it has some features and difficulties that must be taken into account in order to achieve the desired result. Before getting down to business, it is advisable to decide: partial or complete painting of the surface.
There are six main stages in preparing the Audi A6 for painting. During the exercise of each, the driver must be extremely attentive and accurate.
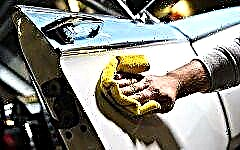
Cleaning the car Audi A6

The first step before proceeding is to wash the surface of the Audi A6. As a rule, this process is carried out indoors (that is, a garage), and not in a place with direct access to the sun and wind. After that, you need to leave the car for a while, so that it dries up and is ready for further surface treatment.
The next step is to cover the contour of the surface with protective tape for further painting. It is this protective tape that will help protect the varnish-and-paint coating from various kinds of damage. Once it is glued on, you can start removing the corrosion with coarse sandpaper (120 grit) and a screwdriver, or with a triangular file.
After such processing, you need to take sanding paper with a grain of 320 and carry out the deburring around the area to be processed on the surface of the Audi A6. As a rule, a distance of 1 to 2 cm is allowed for such stripping. Here you need to be extremely careful, since the galvanized body elements must be cleaned to the ground, but not to the galvanized coating of the car.
It is also worth remembering that in this car brand there are bodies made of aluminum. To clean such a surface, you need to remove the old paint and use degreasers. Remember that paint removal occurs quickly on such bodies, which means that it is also easy to damage the body itself. Therefore, it is necessary to remove the damaged paint carefully and preferably in manual mode without special devices.
Application of anti-corrosion primer

In this step, you need to start by cleaning the damaged surface area of the Audi A6. To do this, you need to treat the desired area with a nitro solvent and clean rags. This will get rid of various types of grease and surface contaminants. For the Audi A6, it is best to use Primer.
Most often, there are cases when motorists do not responsibly approach the selection of paint and surface primer. To avoid this kind of problems, professionals recommend using the appropriate paint color, as well as sticking to the same manufacturer, that is, the purchased materials must be from the same manufacturer. When motorists do not adhere to this rule, then problems arise with the painted surface of the car, namely, the treated surface begins to wrinkle and is taken by bubbles.
Then take Primer and spray the entire surface of the Audi A6 with a thin jet at a distance of 25 cm. To avoid getting the primer on the surrounding areas, cover them with newspapers or protective tape.
Once the entire desired surface of the Audi A6 has been primed, the problem area is left to ventilate for 10 or 15 minutes. As soon as this time has passed, you need to once again process this location with a primer and leave the car alone to dry in order to apply the putty in the future without problems.
Again, do not forget about special bodies and surfaces, galvanized or aluminum, before applying the primer, you should thoroughly degrease the surface. It is also worth choosing materials designed to work with this type of body material, then there will be a guarantee of high-quality work performed.
Putty problem area Audi A6

Professionals distinguish two main types of putty - thin and two-component. There are three key criteria by which they can be distinguished. The first is that it is mixed into a two-component putty with a hardener before the processing itself, but the thin one is distinguished by its ductility. The second is the use of this material. For example, a two-component is used to level fairly large uneven metal surfaces, while the second helps to level small surfaces. Third - the first type must be applied very quickly, since it hardens, but thin, as a rule, is used in several layers. At this stage, you will need a putty, both in aerosol containers and in tubes and paints.
Now to action. The two-component putty is applied to the problematic or fiberglass-sealed surface that has been aligned. After that, you need to let it harden. Here you need to adhere to all the recommendations of the manufacturers indicated on the packaging of the material.

When the putty has frozen on the problem surface of the Audi A6, you can start manual cleaning, but you can also use a vibrating grinder. Cleaning the surface is carried out using paper with a grain of 180. After that, waterproof sanding paper is used, since you will need to moisten the problem area with plenty of water.
Grinding ends when the surface of the Audi A6 being repaired is dried for some time and wiped off. Then a thin layer of putty is applied using a flexible plastic spatula. It also takes about two hours for this material to cure.
Professionals in the process of preparing for painting and the painting itself recommend using an aerosol putty precisely in those places of the surface where there are various contours and curves. Next, you need to leave a thin putty to dry. It can dry for 2 to 3 hours. As a rule, it all depends on the thickness of the material applied to the problem surface of the car.
Surface sanding

Sanding will require tools such as 180 to 240 grit sanding paper (for sanding a two-component putty), also 360 grit (for sanding old paint and putty), and 600 grit paper (to complete the sanding process).
It should be noted that the larger the number of sanding paper, the softer it is. The problematic area of the surface, which must be putty, must be treated with sanding paper with a grain of 360.
While sanding, you will need to hold the damp sponge over the desired surface. From time to time, the sponge must be moistened in water. Next, sand the wet treated surface with 600 grit waterproof paper.
After sanding the main repair points of the Audi A6, you should also not skip sanding the circumferential points. The grinding process should be carried out in the direction of the longitudinal dimension of the vehicle. If minor scratches remain in the process of processing with special paper, then do not worry - further surface treatment with paint will cover all this and the defects will not be visible.
Cleaning of repair places of the car Audi A6

To clean problem areas of the surface, it is necessary to remove grease and silicone with a silicone remover. There is a so-called "cleared area", that is, it is a location around an already sanded area two palms wide, as well as the surface of an already sanded surface.
Cleaning the problem area must be carried out carefully, and in order not to hook the untreated normal surface, it is necessary to glue it over with newspapers and adhesive tape. And also do not forget to protect all untreated locations before the actual process of painting problem surfaces.
When gluing each problem area, it is necessary to ensure that the surface to be painted is limited to the nearest edge of the body or molding, since then a bump of paint may appear. In order to make an imperceptible transition from the original varnish-and-paint coating to the updated one, you will need to glue the location from the painting site at a distance of two palms (wide).
And finally, one more tip: before you start painting the Audi A6 car, you need to wash the floor in the garage. This is to prevent too much dust from entering the surface of the machine. This completes the process of preparing the Audi A6 for painting. This is followed by the painting process.
Audi